
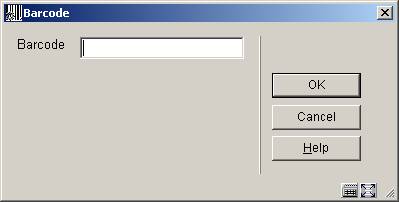
You can either key in or scan a barcode here. This will take you straight to the overview screen with item information (see section 423.3).
AFO 423 can be used to view the status of an item and to modify some of the information about the item. The information that can be changed is as follows:
·
a new barcode can be assigned to the item;
·
the item category can be modified;
·
if appendixes go with the item and whether on loan proof of registration is required can be indicated
·
the item can be 'manually' called back
·
the item status can be changed, e.g. to “missing”
Note
When there is a transaction for an item and/or you are not the owner of the item, it is not possible to modify certain item.
This AFO can also be used to view information about items that have been removed from the catalogue using AFO 112 ('Delete items'). AFO 423 is also accessible using the copy screen in AFO 111 ('Cataloguing').
The system can be configured in such a way that only certain passwords can use the 'view facilities'. The system distinguishes between passwords with:
·
'system facilities': fields in this AFO can be entered, modified and viewed; use can be made of all options in AFO 423;
·
'view facilities': fields can only be viewed; no authorisation is given for all other options in AFO 423.
Using AFO 611 ('Password control'), you can indicate which passwords are to be given 'system facilities' in AFO 423.
After choosing this option the following search form will be displayed:
You can either key in or scan a barcode here. This will take you straight to the overview screen with item information (see section 423.3).
Alternatively you can click on . In that case you will be offered the standard screen for bibliographic searches. You will then have to click your way to result list etc., before ending up on the overview screen with item information.
After identifying the item, you will be presented with the overview screen with item information:
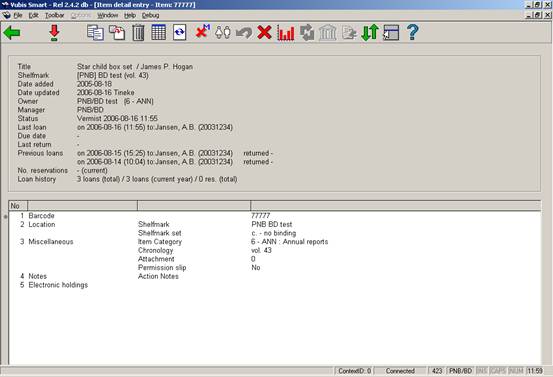
The top half of the screen contains all kinds of information about the item. This information is generated by the system and cannot be changed (protected field). The information in the bottom half of the screen can (in certain cases) be modified.
Title: the item's title.
Shelfmark: the shelfmark for the item displayed in the form [Institution] Location [Sublocation] Shelfmark.
Date added: the date on which the item was added to the catalogue.
Date updated: the date on which the item data was last modified.
Owner: the code for the Location Manager that owns the item.
Manager: - the code for the that is currently managing the item
Note
For example, if the item has been sent to another branch to satisfy a reservation, that branch's Location Manager code will be shown here.
Status: the item's status. Vubis Smart uses the following statuses:
· In the library
· Out on loan - the due date will be displayed in the Due date field.
· Reservation available for pickup - the item is awaiting pickup at the Manager location.
· In transit from Institution/Location to Institution/Location - the item is on its way from the first location to the second location.
· Being transferred from Institution/Location to Institution/Location - the item is due to move from the first location to the second location but has not left the first library yet.
· Reservation - not trapped - the item is on the library shelf but has not been trapped for the reservation. This status is new in Vubis Smart version 2.1.1. If the reservation is on the shelf and not trapped it will also be on a Picklist.
Note
In addition to the statuses assigned by the system, you can also assign a variety of items to an item, for example: 'missing', 'at binder's', 'to cataloguing department', 'temporarily removed from collection', 'to repair department', et cetera. The status can be assigned using AFO 462 and AFO 463.
Last loan: shows the date on which the item was lent, followed by the name of the borrower and their barcode number. If the item was never lent, this field will be empty.
Note
This information is changed as soon as the item is lent.
Due date: the date the item is due for return if it is out on loan. If the item is not on loan, this field will be empty.
Last return: shows the date on which the item was last returned, the time and the location. This information disappears when the item is lent again. If the item was never returned, this field will be empty.
Note
This information is changed as soon as the item is lent.
Previous loans: this field contains previous loans, where the borrower’s name is replaced by *****. A parameter determines how many previous loans will be displayed If the item was never lent, this field will be empty.
No. reservations: the number of current reservations. If there are no reservations, this field will be empty.
Loan history.: the following information is displayed separated by forward slashes (/):
· the total number of loans to date.
· the number of loans in the current year.
· the total number of reservations to date
From the overview screen described above you have the option to perform the following actions.
Note
When there is a transaction for an item and/or you are not the owner of the item, it is not possible to modify certain item.
:select a group and double-click. If allowed, you can make changes to the item data. See section 423.4.1.
: copy the item information to a new item record. See section 423.4.2.
: copy the item information to add multiple new item records. See section 423.4.2.
: delete the item record. This can only be done when there are no transactions and you are the owner.
: use this option to look at the history of item status changes. See section 423.4.3.
: display or not display the header pane.
: to change the item status. See section 423.4.3.
: details of the current borrower who has the item on loan, as in AFO 431.
: used to trigger a (manual) recall notice.
: do not recall this item if automatic recall is used.
: displays total number of loans for the item, loans this year and loans in previous years.

: details of when the item was currently transferred from where and where to. See section 423.4.4.
: when the item was sent, where to and how often it was sent in the past. See section 423.4.4.
: only available if you use sublocation administration.
: This option takes you to the reservations queue as in AFO 422. Only available if there are outstanding reservations for the item.
:select a group and double-click. If allowed, you can make changes to the following item data groups: Barcode, Location, Miscellaneous, Notes, Electronic Holdings.
Barcode: Contains the barcode number of the item. After the barcode or copy number has been replaced, the item can be looked up using the original or the new number. Both numbers are displayed in the Barcode field on the Edit items screen. The original number is marked OBC.
Select this line to add a new barcode, an input screen is displayed:
Location: after choosing this option, the following input form is displayed:

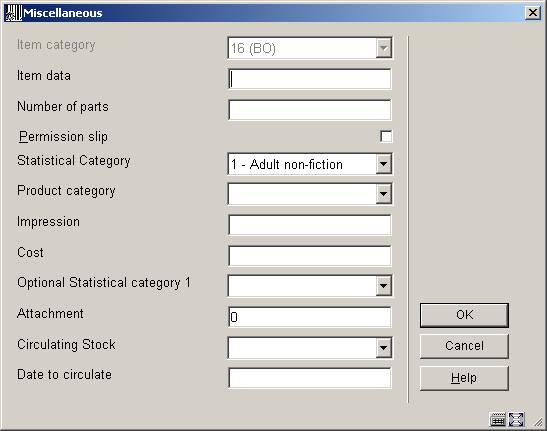
Miscellaneous: after choosing this option, the following input form is displayed:
Notes : after choosing this option, the following input form is displayed:

After having chosen a type a new form is displayed:

Note
This information is displayed as an alert in and .
In this field the last note of each type (Attachment, Reproduction, Ownership, Non-public, Public, Return, Terms, Version Identification) – as defined in AFO 469 – is shown. The screen shows all types of notes related to the item, sorted by note type. You can add, modify or delete notes here. When adding a new note and there are already notes of that type, you will be taken to the overview screen with notes first.
You must enter either a code or text but not both. All note types except Return, can have multiple notes.
Electronic holdings : after choosing this option, the following input form is displayed:

You can add or update information relating to the electronic holdings . The form contains the fields as defined in ‘in use’ in AFO 469 in the group Electronic Objects (Item Definition Settings).
There are various ways to add items to a title by copying information.
: copy the item information to a new item record. After choosing this option the following form will be displayed:

The fields marked in AFO 469 (Item Definition Settings) as to be copied, will be filled with data from the current item. Each field selected, even if not shown on this form, will be copied. This information can be modified.
You enter a barcode and save the record. The item is created and you will be shown the overview screen for the item just added. You can now make further modifications if necessary.
: copy the item information to add multiple new item records. After choosing this option the following form will be displayed:

Scan a barcode and a new item will be created using fields marked in AFO 469 (Item Definition Settings) as to be copied. Every time after clicking , you can add another barcode. The counter after Number of barcodes entered, will be incremented automatically. When you have finished adding barcodes you click on . Now you will be shown the overview screen for the last item just added
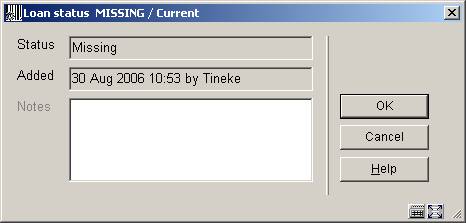
: to change the item status. This can be used to set items to ‘claimed returned’, ‘missing’ etc. After choosing this option the following form will be displayed:

If the item was already set to some special status, then the form will be shown with the current values completed, and may be used to update or change the status.
Loan status type: choose a type from the dropdown list. Different types result in different behaviour of the system. See the Help on AFO 481 – Main circulation parameters – Loan status code settings for more information.
Notes: Optionally add comments. It is also possible to simply add a note to the item, by leaving the loan status empty.
User date: Optionally you can enter the date on which the user claims he/she already returned the item.
A previous status may be removed by using the “” button or by clearing the data fields on the input form.
Items which have had a loan status set will have some of the details of the original loans together with relevant details of the loan status. When a loan status code changes, then we keep a history of these changes i.e. to track the change of claimed returned, to lost.(for example). This history can be displayed by using the option. After choosing this option the following overview screen will be displayed:

The Note column displays in what state the various statuses are.
You can double click on a line to see the historical details of the selected status. This may vary for different statuses.
Whether or not historical information is retained for a status depends on a parameter in AFO 481 – Main circulation parameters – Loan status code settings. However the system always keeps the PREVIOUS setting for an item, when the loan status is cleared. For example, we keep a note that an item HAD been set to Lost even when it has been found.
: Use this option to obtain information about an item that is involved in a transfer between libraries. The option will be greyed out if the item is not related to a current transfer. If an item has been moved from one location to another (AFO’s 462 and 463) or has been given a special status, the information will be shown here.

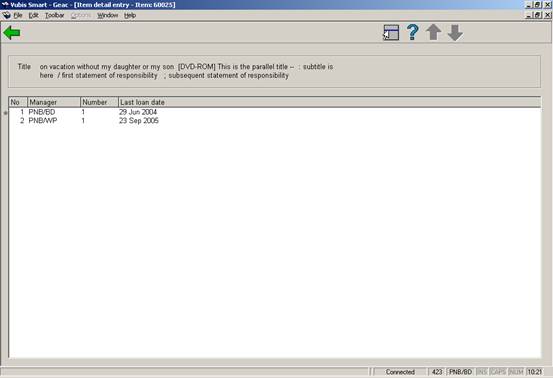
: when the item was sent, where to and how often it was sent in the past. The screen shows all managers who have ever received the item, how often this happened and the date of the last transfer.
· Document control - Change History
|
Version |
Date |
Change description |
Author |
|
|
1.0 |
unknown |
creation |
|
|
|
2.0 |
September 2006 |
updates for release 2.4.1 build 17 |
|
|
|
3.0 |
November 2006 |
changed terminology (delivered as part of release 2.4.2 build 1 updates) |
|
|